Note
Access to this page requires authorization. You can try signing in or changing directories.
Access to this page requires authorization. You can try changing directories.
Use the Microsoft Dev Box customizations feature to streamline setting up cloud-based development environments. Starting a new project or joining a new team can be complex and time consuming. Team customizations use an image definition file (imagedefinition.yaml) to preinstall tools, clone repos, and set settings for every dev box in a pool. With team customizations, administrators can provide ready-to-code workstations with apps, tools, repositories, code libraries, packages, and build scripts. This article shows you how to create, test, and edit an image definition file for your dev box in Visual Studio Code.
You can use customizations in Dev Box in two ways. Team customizations create a shared configuration for a team. User customizations create a personal configuration for an individual developer. The following list summarizes the differences between these customization types.
- Team customizations: Defined once, applied to every dev box in a pool via imagedefinition.yaml in a catalog.
- User customizations: Personal YAML uploaded during box creation; affects only that one box.
- Use team for consistency and compliance; use user for personal preferences.
To learn more, see Microsoft Dev Box customizations.
Configure team customizations by following these steps:

Prerequisites
| Product | Requirements |
|---|---|
| Microsoft Dev Box | - Set up a dev center with a dev box pool and a dev box project so you can create a dev box. - Attach a catalog to the dev center with tasks you can use in your image definition file. If you don't have a catalog, see Add and configure a catalog from GitHub or Azure Repos. - Permissions - To create a dev box: Join the Dev Box Users security group for at least one project. - To enable project-level catalogs for a dev center: Platform engineer with write access on the subscription. - To enable catalog sync settings for a project: Platform engineer with write access on the subscription. - To attach a catalog to a project: Dev Center Project Admin or Contributor permissions on the project. |
| Visual Studio Code | - Install the latest version |
Create an image definition file
To define the tools, packages, and configurations your team needs, create an image definition file in YAML format that lists the required tasks for your dev box environment.
Use built-in tasks or a catalog for custom tasks
Tasks are reusable actions that come from built-in primitives (WinGet, PowerShell, and Git-Clone) or from a catalog you attach to your dev center project. Choose the source that best fits your customization needs and project requirements.
Use WinGet, PowerShell, and Git-Clone built-in tasks. Dev Box dev centers support PowerShell and WinGet tasks out of the box. If your customizations require only PowerShell, WinGet, or Git-Clone you can get started with these built-in tasks and create your image definition file. For more information, see Create an image definition file.
Important
The WinGet built-in task isn't the same as the WinGet executable. The WinGet built-in task is based on the PowerShell WinGet cmdlet.
Use a catalog to define custom tasks. Create your own custom tasks. To make custom tasks available to your entire organization, attach a catalog that has custom task definitions to your dev center. Dev Box supports Azure Repos and GitHub catalogs. Because tasks are defined only at the dev center, store tasks and image definitions in separate repositories.
To learn more about defining custom tasks, see Configure tasks for Dev Box customizations.
Dev Box supports an agentic workflow with GitHub Copilot agent mode. Use natural language prompts to generate the image definition file (imagedefinition.yaml). GitHub Copilot makes it easier to set up your Dev Box environment because you describe your needs conversationally instead of manually creating YAML files.
The Dev Box agentic workflow lets you:
- Mimic your current development environment - Generate or change a definition that matches the configuration of your current machine.
- Use repository context - Create or change a definition in the context of a specific GitHub repository.
- Use natural language instructions - Generate an image definition file by describing the development environment you want.
Note
The agentic workflow supports only Dev Box primitive tasks, including WinGet, PowerShell, and Git-Clone.
Generate the image definition file
Open Visual Studio Code.
Install the Dev Box extension.
Open Extensions (Ctrl+Shift+X), search for Dev Box, and install the extension.

Install the GitHub Copilot extension set up in VS Code.
Make sure agent mode is enabled by setting chat.agent.enabled in the Settings editor. This setting requires Visual Studio Code 1.99 or later.
Open Copilot Chat in VS Code.
Make sure Dev Box tools are preselected under Select tools.


Select Agent Mode, and choose the model: Claude 3.5 Sonnet.

Provide natural language prompts, such as:
"I want to set up a dev box with all the tools and packages required to work on this [repo name] repo."
"I want to preinstall Visual Studio 2022 Enterprise, Visual Studio Code, Git, .NET SDK 8, Node.js LTS, and Docker Desktop on a dev box, and have the team's repo [URL] cloned onto the dev box."
"I want to set up a dev box with all the dev tools and packages installed on my current machine."
Tip
Clone and open the specific repo in Visual Studio Code if you want to generate the definition in the context of a repository.
Follow the prompts to configure packages.
When prompted, select Continue to continue with package setup.
Copilot generates the imagedefinition.yaml file.
Refine with more prompts.
- Continue interacting with the agent until the tools and packages you want appear in the file.
Upload the image definition file to a repository
You can use a GitHub or Azure Repos repository as a catalog to make your image definition file accessible from a dev box project. Each project can have a catalog that stores multiple image definition files, which you can configure on pools to align to your developers teams' needs.
Once you have an image definition file that you want to use, upload it to a catalog. The following sections show you how to attach your catalog to a project, and make your image definition available for selection when configuring your dev box pools.
Configure image definitions at the project level
Projects help you manage Dev Box resources efficiently. You can assign each developer team its own project to organize resources effectively. Create multiple image definitions in your catalog repository, each in its own folder to target different developer teams under your project.
Enable project-level catalogs
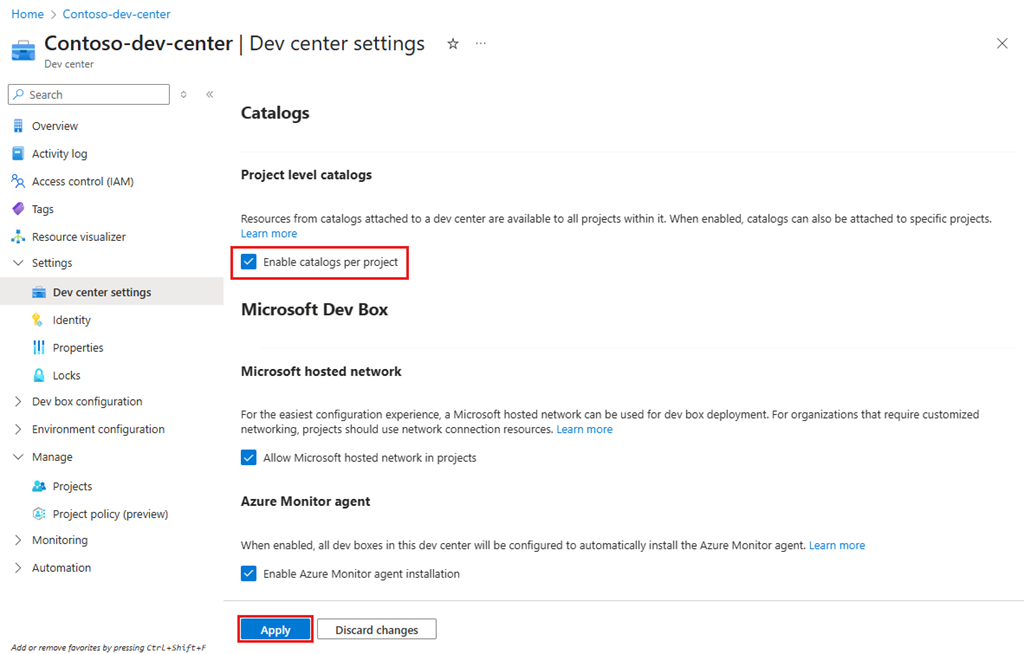
Enable project-level catalogs at the dev center level before you add a catalog to a project. To enable project-level catalogs at the dev center level:
In the Azure portal, go to your dev center.
In the left menu, under Settings, select Dev center settings.
Under Project level catalogs, select Enable catalogs per project, and then select Apply.

For more information about how to add catalogs to projects, see Add and configure a catalog from GitHub or Azure Repos.
Configure catalog sync settings for the project
Set up your project to sync image definitions from the catalog. This setting lets you use the image definitions in the catalog to create dev box pools.
Sign in to the Azure portal.
In the search box, enter projects. From the list of results, select Projects.
Open the Dev Box project where you want to set up catalog sync settings.
Select Catalogs.
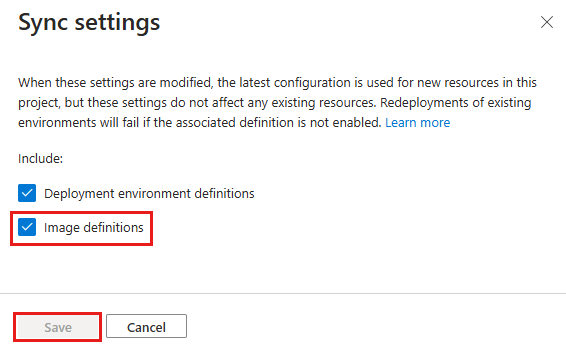
Select Sync settings.

On the Sync settings pane, select Image definitions, then select Save.

Attach the catalog that contains the image definition file
To use an image definition file, attach the catalog containing the file to your project. This makes the image definition available for selection when configuring your dev box pools.
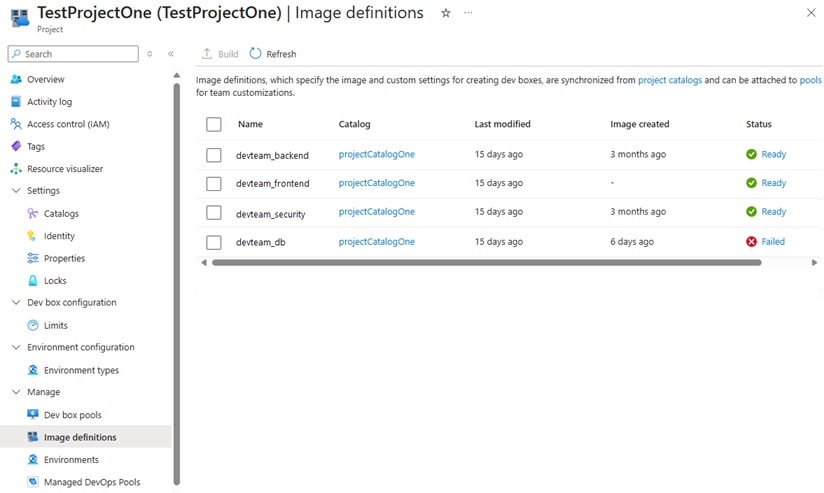
The Image definitions pane shows the image definitions your project can use.

To learn how to attach catalogs, see Add and configure a catalog from GitHub or Azure Repos.
Configure a dev box pool to use an image definition
Let your development team use customizations by setting up a dev box pool with an image definition file. Store the image definition file in a repository linked to your project as a catalog. Specify this file as the image definition for the pool, and the customizations apply to new dev boxes.
Follow these steps to create a dev box pool and specify an image definition:
Sign in to the Azure portal.
In the search box, enter projects. In the list of results, select Projects.
Open the Dev Box project with which you want to associate the new dev box pool.
Select Dev box pools, and then select Create.
On the Create a dev box pool pane, enter the following values:
Setting Value Name Enter a name for the pool. The pool name is visible to developers when they create dev boxes. It must be unique within a project. Definition This box lists image definitions from accessible catalogs and dev box definitions. Select an image definition file. Network connection Select Deploy to a Microsoft hosted network or use an existing network connection. Enable single sign-on Select Yes to let single sign-on for the dev boxes in this pool. Single sign-on needs to be set up for the organization. For more information, see Enable single sign-on for dev boxes. Dev box Creator Privileges Select Local Administrator or Standard User. Enable Auto-stop Yes is the default. Select No to turn off the autostop schedule. You can set up an autostop schedule after the pool is created. Stop time Select a time to stop all the dev boxes in the pool. Time zone Select the time zone for the stop time. Licensing Select this checkbox to confirm that your organization has Azure Hybrid Benefit licenses to apply to the dev boxes in this pool. Select Create.
Check that the new dev box pool appears in the list. You might need to refresh the screen.
Create a dev box using the developer portal
To check that customizations from the image definition file are applied, create a dev box in the Dev Box developer portal. Follow the steps in Quickstart: Create and connect to a dev box by using the Dev Box developer portal. Then connect to the new dev box and check that the customizations work as you expect.
Make changes to the image definition file and create a new dev box to test them. When you're sure the customizations are correct, build a reusable image.
Next step
Now that you have an image definition file that configures and creates dev boxes for your development team, learn how to optimize dev box creation time with dev center imaging.


