Note
Access to this page requires authorization. You can try signing in or changing directories.
Access to this page requires authorization. You can try changing directories.
In this quickstart, you learn how to use an Azure Managed Redis cache from a Node.js application written in the TypeScript language and authenticate the Redis connection by using Microsoft Entra ID.
Prerequisites
Azure subscription - create one for free
Install Node.js LTS
Install TypeScript
Add the packages used in this quickstart to your project:
npm install redis @redis/entraid @redis/clientAuthenticate to Azure for your development environment with Azure CLI:
az login
The Quickstart sample code in this article is available on GitHub.
Create an Azure Managed Redis instance
First, create an Azure Managed Redis cache in the Azure portal.
When you create the cache, Microsoft Entra ID authentication is enabled by default, which makes it secure from the start. For this quickstart, the cache uses a public endpoint. In production, consider using private endpoints and other network controls.
- To create a cache with the portal, follow one of these procedures:
-
Optionally, you can create a cache by using Azure CLI, PowerShell, or whichever tool you prefer.
Code to connect to a Redis cache
In the first part of the TypeScript code sample file, index.ts, configure your connection to the cache:
import { DefaultAzureCredential } from '@azure/identity';
import { EntraIdCredentialsProviderFactory, REDIS_SCOPE_DEFAULT } from '@redis/entraid';
import { createCluster, RedisClusterType, RedisModules, RedisFunctions, RedisScripts } from '@redis/client';
import * as net from 'node:net';

const redisEndpoint = process.env.REDIS_ENDPOINT!;
if (!redisEndpoint) {
    console.error('REDIS_ENDPOINT is not set. It should look like: `cache-name.region-name.redis.azure.net:<PORT>`. Find the endpoint in the Azure portal.');
    process.exit(1);
}

const [redisHostName, _] = redisEndpoint.split(":");

let client;

function createRedisClient(): RedisClusterType<RedisModules, RedisFunctions, RedisScripts>  {

    const credential = new DefaultAzureCredential();

    const provider = EntraIdCredentialsProviderFactory.createForDefaultAzureCredential({
        credential,
        scopes: REDIS_SCOPE_DEFAULT,
        options: {},
        tokenManagerConfig: {
            expirationRefreshRatio: 0.8
        }
    });

    const client = createCluster<RedisModules, RedisFunctions, RedisScripts>({
        rootNodes: [{ url: `rediss://${redisEndpoint}` }],
        defaults: {
            credentialsProvider: provider,
            socket: {
                connectTimeout: 15000,
                tls: true,

                // This quickstart code uses a fail fast `reconnectStrategy` which
                // is suitable only in sample code. The purpose is to quickly
                // demonstrate the functionality without getting stuck in
                // reconnection loops if your endpoint or authentication is not
                // correctly configured. In production code, a more robust
                // `reconnectStrategy` should be implemented.
                reconnectStrategy: () => new Error('Failure to connect')
            }

        },
        nodeAddressMap(incomingAddress) {
            const [hostNameOrIP, port] = incomingAddress.split(":");

            const address =
                net.isIP(hostNameOrIP) !== 0
                    ? redisHostName
                    : hostNameOrIP;

            return {
                host: address,
                port: Number(port),
            };
        }

    });

    client.on('error', (err) => console.error('Redis cluster error:', err));

    return client;
}
Use the createRedisClient() function to create a node-redis client connection to the Redis cache..
client = createRedisClient();
await client.connect();
Code to test a connection
In the next section, test the connection by using the Redis PING command. The Redis server returns PONG.
const pingResult = await client.ping();
console.log('Ping result:', pingResult);
Code set a key, get a key
In this section, use SET and GET commands to start writing and reading data in the Redis cache in the simplest way.
const setResult = await client.set("Message", "Hello! The cache is working from Node.js!");
console.log('Set result:', setResult);

const getResult = await client.get("Message");
console.log('Get result:', getResult);
Run the code
Build and run the Node.js application.
tsc
node index.js
The result looks like this:
Ping result: PONG
Set result: OK
Get result: Hello! The cache is working from Node.js!
Here, you can see this code sample in its entirety.
import { DefaultAzureCredential } from '@azure/identity';
import { EntraIdCredentialsProviderFactory, REDIS_SCOPE_DEFAULT } from '@redis/entraid';
import { createCluster, RedisClusterType, RedisModules, RedisFunctions, RedisScripts } from '@redis/client';
import * as net from 'node:net';

const redisEndpoint = process.env.REDIS_ENDPOINT!;
if (!redisEndpoint) {
    console.error('REDIS_ENDPOINT is not set. It should look like: `cache-name.region-name.redis.azure.net:<PORT>`. Find the endpoint in the Azure portal.');
    process.exit(1);
}

const [redisHostName, _] = redisEndpoint.split(":");

let client;

function createRedisClient(): RedisClusterType<RedisModules, RedisFunctions, RedisScripts>  {

    const credential = new DefaultAzureCredential();

    const provider = EntraIdCredentialsProviderFactory.createForDefaultAzureCredential({
        credential,
        scopes: REDIS_SCOPE_DEFAULT,
        options: {},
        tokenManagerConfig: {
            expirationRefreshRatio: 0.8
        }
    });

    const client = createCluster<RedisModules, RedisFunctions, RedisScripts>({
        rootNodes: [{ url: `rediss://${redisEndpoint}` }],
        defaults: {
            credentialsProvider: provider,
            socket: {
                connectTimeout: 15000,
                tls: true,

                // This quickstart code uses a fail fast `reconnectStrategy` which
                // is suitable only in sample code. The purpose is to quickly
                // demonstrate the functionality without getting stuck in
                // reconnection loops if your endpoint or authentication is not
                // correctly configured. In production code, a more robust
                // `reconnectStrategy` should be implemented.
                reconnectStrategy: () => new Error('Failure to connect')
            }

        },
        nodeAddressMap(incomingAddress) {
            const [hostNameOrIP, port] = incomingAddress.split(":");

            const address =
                net.isIP(hostNameOrIP) !== 0
                    ? redisHostName
                    : hostNameOrIP;

            return {
                host: address,
                port: Number(port),
            };
        }

    });

    client.on('error', (err) => console.error('Redis cluster error:', err));

    return client;
}

try {

    client = createRedisClient();

    await client.connect();

    const pingResult = await client.ping();
    console.log('Ping result:', pingResult);

    const setResult = await client.set("Message", "Hello! The cache is working from Node.js!");
    console.log('Set result:', setResult);

    const getResult = await client.get("Message");
    console.log('Get result:', getResult);

} catch (err) {
    console.error('Error:', err);
} finally {
    if (client) {
        try {
            await client.quit();
        } catch (quitErr) {
            console.error('Error occurred while quitting Redis client:', quitErr);

        }
    }
}
Clean up resources
If you want to continue to use the resources you created in this article, keep the resource group.
Otherwise, if you're finished with the resources, you can delete the Azure resource group that you created to avoid charges.
Important
Deleting a resource group is irreversible. When you delete a resource group, all the resources in it are permanently deleted. Make sure that you do not accidentally delete the wrong resource group or resources. If you created the resources inside an existing resource group that contains resources you want to keep, you can delete each resource individually instead of deleting the resource group.
To delete a resource group
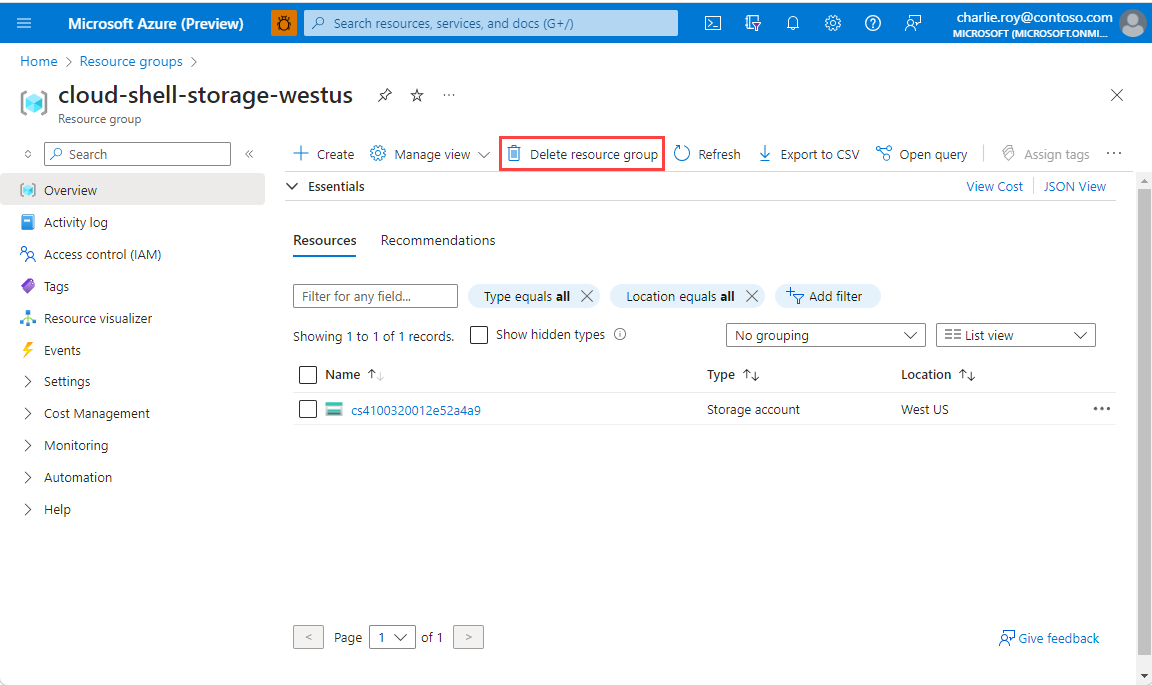
Sign in to the Azure portal, and then select Resource groups.
Select the resource group you want to delete.
If there are many resource groups, use the Filter for any field... box, type the name of your resource group you created for this article. Select the resource group in the results list.

Select Delete resource group.
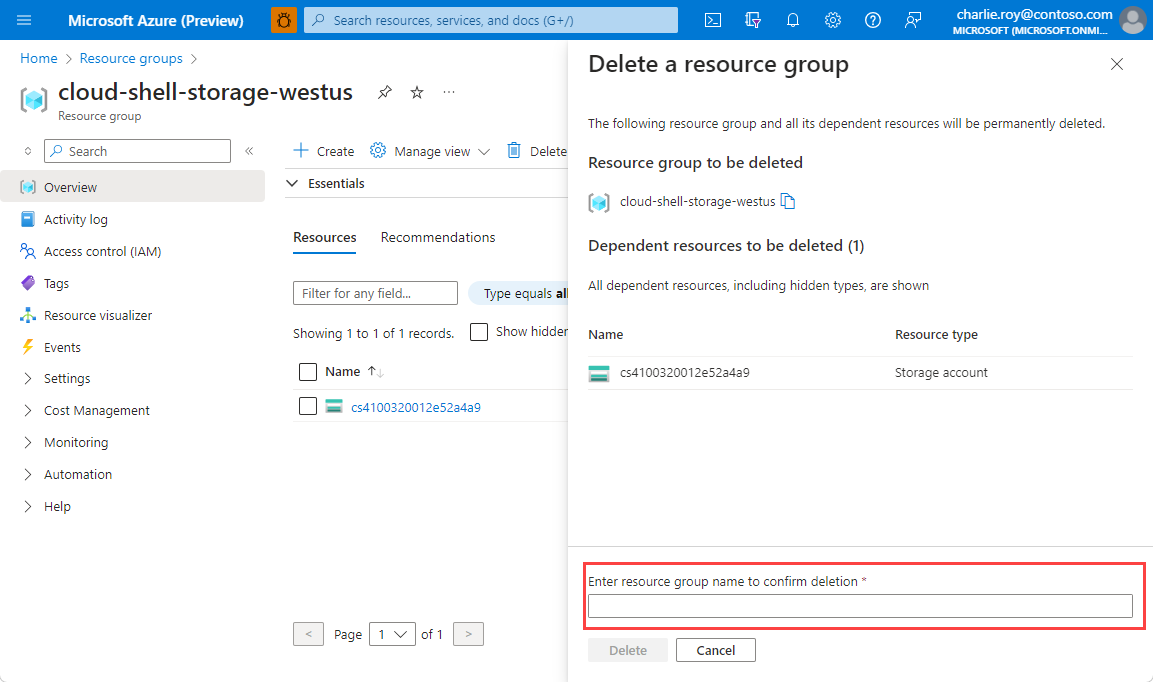
You're asked to confirm the deletion of the resource group. Type the name of your resource group to confirm, and then select Delete.

After a few moments, the resource group and all of its resources are deleted.